by Larry Owens


RegiStax v5 and Saturn

8 March, 2009 (22:41) | Registax, Saturn | By: ltowens

Jim Honeycutt reminded me this past Saturday that RegiStax 5 is available in beta, so since I haven’t been able to image lately, I decided to download it and give it a try on some earlier sets. 

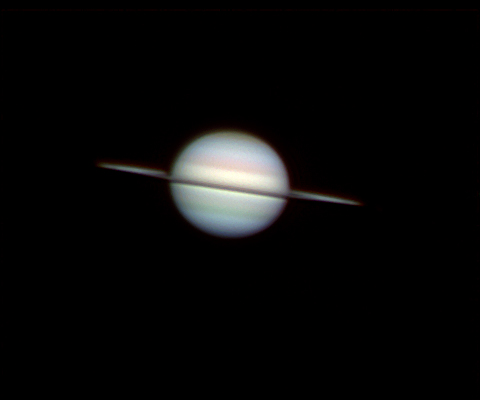
This image was processed with version 5.  I hadn’t bothered to process this set because of the softness of the avi’s.  This one was taken at 07:37UT on February 1st, 2009, CMI: 161.5  CMII: 122.9   CMIII: 14.2:

2009-02-01_02-37-26_rgb_v5_wv_stage1_lrgb_flat_stg2

The avi’s were bouncing around somewhat with a seeing estimate of 3-4/10.  It was taken with a Skynyx2-0M and C14 at F/25.71; Custom Scientific RGB filters.

I was somewhat happy with the results, especially since I’d given up on this set.  Registax5 seemed to pull out some interesting detail from very limited data.


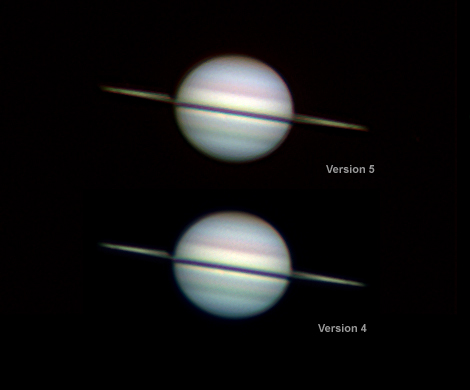
The following is a comparison of the same image processed by Registax4 and 5.  In this comparison, the v5 image seems to have more noise, but I may have gone too far with wavelet processing on my first try with v5.  I typically apply wavelets modestly and let PhotoShop do the rest, but I wanted to test the limits.

2009-02-01_01-39-49_v5_rgb_stage1_v4_v5_compare

I’m happy to see progress on this excellent FREE software for stacking astronomical images.  Being a programmer myself, I know that developing software like this takes hundreds if not thousands of hours of work by dedicated individuals.   Many thanks to the Registax version5 team!

Download RegiStax version 5 here (beta now – released version soon).

Larry

Saturn, February 2009

28 February, 2009 (17:34) | Saturn | By: ltowens

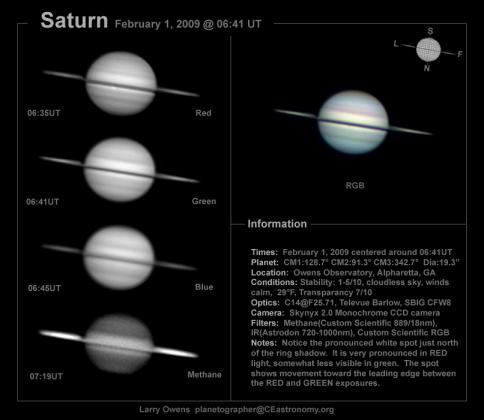
This set of images was taken under slightly better skies and actually picked out one of Saturn’s recent equatorial storms (just under the rings, left of center).  I also imaged in the Methane band, which gives the planet an oddly bright set or rings.  The soft appearance of the Methane shot is due to a 2.5 second exposure per frame. (Click image for a larger view)

saturn_020109_rgb_m_alt_2

Saturn, December 2008

28 February, 2009 (17:28) | Saturn | By: ltowens

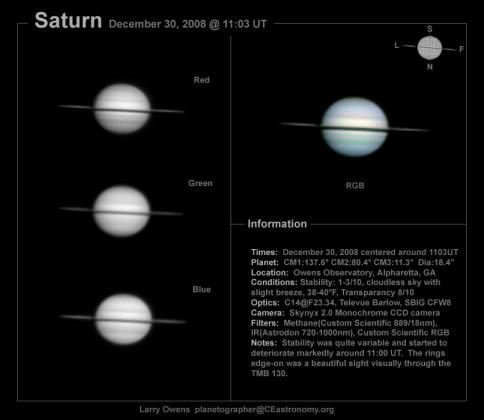
From the fall of 2008 through the winter of 2009, Earth will be near Saturn’s ring plane, giving us an edge-on view of the rings.  Here’s an image taken under somewhat turbulent atmospheric conditions, but it certainly shows the edge-on appearance of the rings (click image for larger view):

saturn_123008_rgb_m_alt_2

Jupiter, September 2008

28 February, 2009 (17:11) | Jupiter | By: ltowens

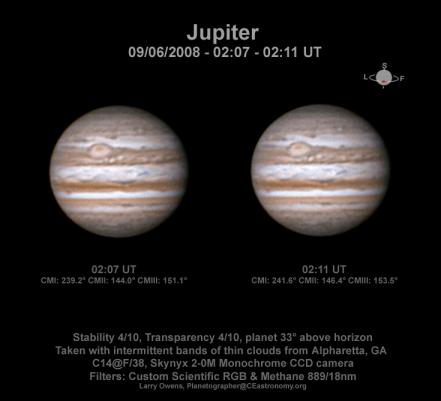
Here are 2 sets of Jupiter taken in Sept, showing the Great Red Spot and Oval BA (near the limb).  The image was taken under intermittien cloud cover and relatively poor stability.  Click image for full sized view.

jupiter_2sets_090508 

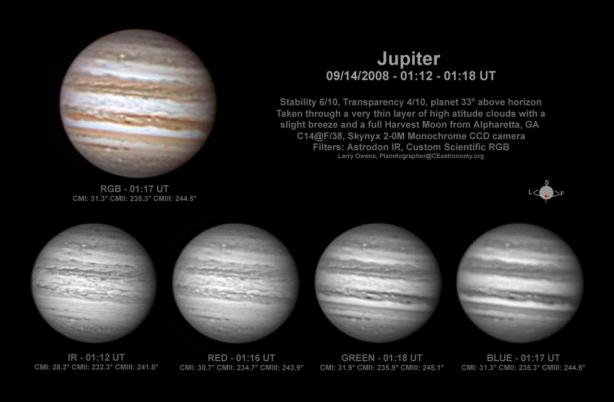
Here’s another September image with somewhat more detail, but of a somewhat less interesting part of the planet.


jupiter_irgbm_0913081 


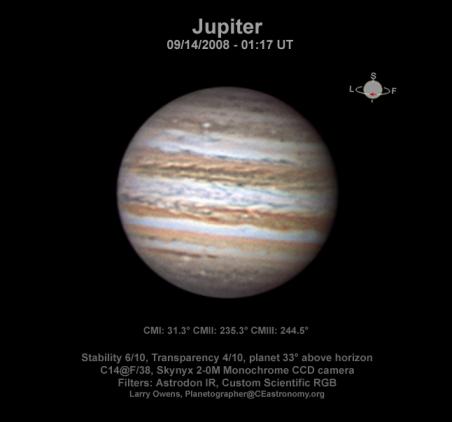
And here’s a slightly enlarged version of the same image presented alone:

 2008-09-13_21-15-15_2500_irrgb_stage2_2x1

Jupiter, August 2008

28 February, 2009 (16:59) | Jupiter | By: ltowens

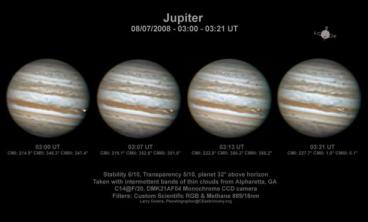
Jupiter has been a challenge this year (2008).  Here’s a set of 4 images with resonable resolution, taken with the DMK and showing the slow progression of one of Jupiter’s moons crossing in front of the great planet (from right to left).  Click image for full sized view.

 jupiter_4sets_080608

The Challenges of Jupiter Imaging

24 August, 2008 (18:42) | Images, Presentations, Video | By: ltowens

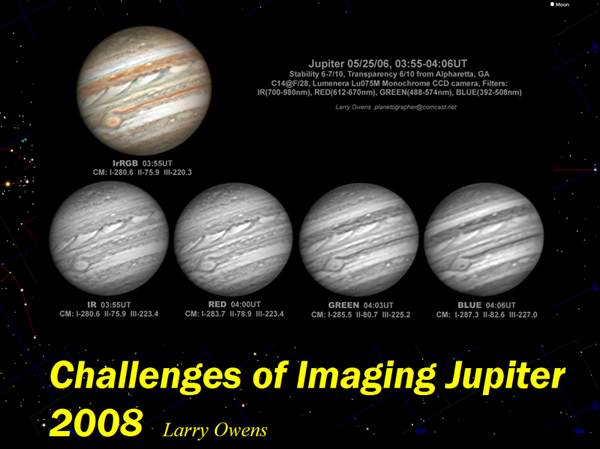
challenges_jupiter.jpg

Hello everyone,

On the surface, imaging the planet Jupiter can seem relatively easy as planets go. It’s big (46″ angular size) and bright (-2.7 magnitude now), in fact Jupiter is the brightest of the planets next to Venus or Mars (during a good opposition). But, imagers are often disappointed with their initial attempts with the great planet.

To help in the quest for high resolution images of Jupiter, I put together a class called “The Challenges of Jupiter Imaging”. Instructor in Astronomy Jim Honeycutt offered a classroom at Emory Univeristy’s Oxford College in Covington, GA, and on August 23, 2008 we presented the class to about 16 amateur astronomers and others interested in the subject.

The class was a lot of fun, and turned out to be educational for everyone, including me. The labs were probably the most interesting and included stacking techniques for Jupiter images using Registax, and some rather detailed color combining and processing tricks in PhotoShopCS.

Thanks to Jim Honeycutt and Oxford College for an excellent place to have the class and for the drinks and snacks everyone enjoyed during break.  Thanks also to Jon Wood for video taping the class!


Below you’ll find links to the presentation, some of the images used in the course and a video of the class.  If you would like to take the course online, first download the presentation, then download the workshop images and watch the video.  You should have Registax v3 or v4 and PhotoShop on your system for the course.  The “avi” files used in the class are not included below because of size, so use some of your own during the course, or just watch the Registax lab.

Link to the Acrobat version of the Presentation (should take 2 minutes on broadband connection)

Link to the PowerPoint version of the Presentation (should take 4-5 minutes on broadband)

Here’s a link to photos taken during the class at Oxford (I’m the bald guy in the plaid shirt)

Here’s an outline of the course.

Below are links to the 5 monochrome workshop images that were used for color combining (Don’t forget to convert these to ”grayscale” before attempting to process them):
NOTE – RIGHT click on each link and “Save Target As” (these are .tif format files):

Jupiter0023, Jupiter0024 (for R(G)B processing – Convert to “grayscale” first)

Jupiter0004, Jupiter0005, Jupiter0006 (for RGB processing – Convert to “grayscale” first)

The video (below) is available in both Windows Media (recommended) and Real Media. Your player should start the video in just a few seconds after clicking the link, but if the player wants to download the video completely before showing it, that should only take a few minutes, so be patient.

Video Part I: Presentation (60 min – Windows Media or Real Media)

Video Part II: Conclusion of presentation, start of workshop (60 min – Windows Media or Real Media)

Video Part III: Workshop (45 min – Windows Media or Real Media)

Here’s the link to “Real Video” if you need the player

Dark skies,

Larry